You can specify that you want to eliminate blank lines or spaces in a report by sliding columns and other controls to the left or up if there is blank space. You can use this feature to remove blank lines in mailing labels or to remove extra spaces between fields (such as first and last name).
![]() Slide is used by default in nested reports
InfoMaker uses slide options automatically when you nest
a report to ensure that the reports are positioned properly.
Slide is used by default in nested reports
InfoMaker uses slide options automatically when you nest
a report to ensure that the reports are positioned properly.
![]() To use sliding columns or controls in a report:
To use sliding columns or controls in a report:
Select Properties from the control's pop-up menu and then select the Position tab in the Properties view.
Select the Slide options you want:
Option |
Description |
|---|---|
Slide Left |
Slide the column or control to the left if there is nothing to the left. Be sure the control does not overlap the control to the left. Sliding left will not work if the controls overlap. |
Slide Up - All Above |
Slide the column or control up if there is nothing in the row above. The row above must be completely empty for the column or control to slide up. |
Slide Up - Directly Above |
Slide the column or control up if there is nothing directly above it in the row above. |
These options are also available on PainterBar2.
![]() If you are sliding columns up
Even blank columns have height; if you want columns to slide
up, you need to specify as Autosize Height all columns above them
that might be blank and that you want to slide other columns up
through.
If you are sliding columns up
Even blank columns have height; if you want columns to slide
up, you need to specify as Autosize Height all columns above them
that might be blank and that you want to slide other columns up
through.
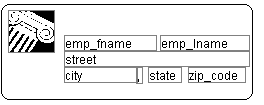
In a mailing label that includes first and last names, as well as address information, you can use sliding to combine the columns appropriately.
In the following label, emp_lname, the comma, state, and zip_code are specified as slide left. Edges are shown to indicate the spacing between the columns. Notice that there is a small amount of space between controls. This space is necessary for Slide Left to work properly:

When you preview (run) the report, the last name, comma, state, and zip code slide left to remove the blank space:
