![]()
![]()
![]()
![]()
Running the map involves identifying the data, map, and logging details and includes the following steps:
Run the compliance map. You refer to the directory in which the compliance map was installed.
Optionally create a functional acknowledgement, using the output of the compliance map (translog.in) as the input to the 997 map.
![]() Running compliance maps
Running compliance maps
This procedure describes the prerequisites and steps to run compliance maps.
Open ECMap’s and, in the main window, select Build > Run Map from the menu.
The Run Inbound Map window displays with the Required tab active.
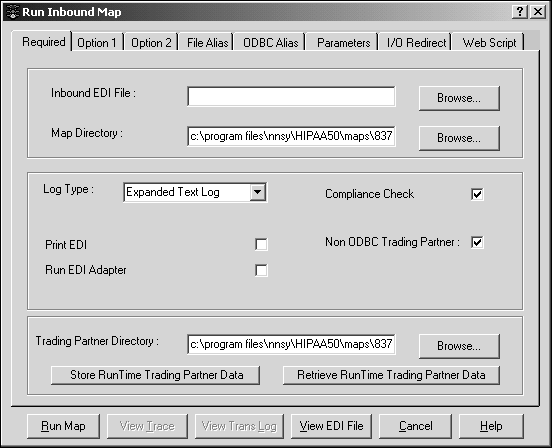
Identify the incoming map information:
Inbound EDI File is the full path name of the file containing the EDI data to be translated by the map. You can type the full directory path, including the file name with file extension, or click Browse to locate the file.
Map Directory is the full path name of the directory containing the generated map (.map file). This is the map directory that you defined on the Map Directories tab of the Maps screen, and it is automatically populated by the program. If you choose, you can type a different directory or search for one using the Browse button.
While the program is processing the EDI data, it places information in a log file. The Log Type specifies how that information is recorded.
If you set up an ODBC-compliant log database on the Maps DSN tab of the New Map screen when you created the map, the File Type must be ODBC Log.
If you did not set up an ODBC log database, you have three choices: Text Log, No Log, or Expanded Text Log.
If you choose Text Log, the program writes entries to a short log, containing fewer fields than the expanded text log, when the map runs. This selections precludes the ability to run acknowledgements.
If you choose No Log, the program does not write entries to the log when the map runs. This selections precludes the ability to run acknowledgements.
If you choose Expanded Text Log, the program writes entries to a sequential log file that contains all the same fields as the ODBC log.
If you plan to build and send a Functional Acknowledgement (997) for the transaction being processed, you must choose either ODBC Log or Expanded Text Log. See the ECRTP User’s Guide for formats of these log files.
Select the Compliance Check box if you want to perform a compliance check comparing the EDI data being sent or received with the applicable EDI standard. To use this option, you must generate the map as a compliance map, and you must use CMP as the purpose on the General tab of the Trade Agreement screen.
Deselect the Print EDI and Run EDI Adapter boxes. See The “Running Map” chapter in the ECMap User’s Guide for information about these options.
Select the Non ODBC Trading Partner box if you are not using a database for trading partner information. Do not select this check box if you are using an ODBC database.
You can type the directory path in the Trading Partner Directory text box or search by clicking Browse.
![]() You must type or browse to the Trading Partner Directory
if you checked Non-ODBC Trading Partner. This directory contains
your dBase III trading partner (customer.dbf)
and trade agreement (tradstat.dbf) files.
You must type or browse to the Trading Partner Directory
if you checked Non-ODBC Trading Partner. This directory contains
your dBase III trading partner (customer.dbf)
and trade agreement (tradstat.dbf) files.
The Store RunTime Trading Partner Data and Retrieve RunTime Trading Partner Data buttons are enabled if you checked the Non ODBC Trading Partner box.
Click the Store RunTime Trading Partner Data button the first time you set up a compliance map. Otherwise, use these buttons for non-ODBC databases if you are concerned about a disparity between the actual control counts and the control counts that display. See the ECMap User’s Guide for more information on the Store RunTime Trading Partner Data and Retrieve RunTime Trading Partner Data features.
Click the Option 1 tab of the Run Inbound Map window to make it active and supply the following information, where appropriate:
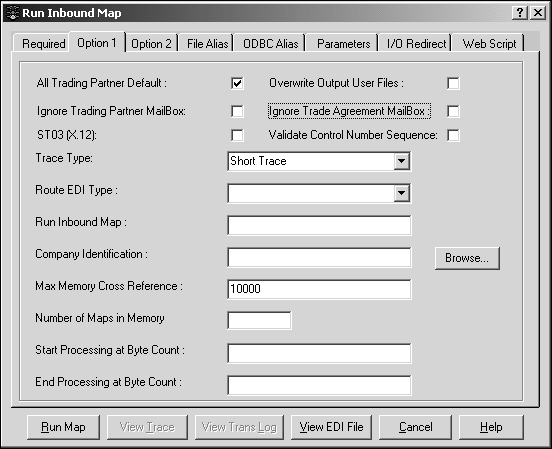
Select the All Trading Partner Default box.
When All Trading Partner Default is selected, the program defaults to the ALL TradePartner if it does not find a trade agreement for the trading partner when the map runs. This option is useful when:
Data is first processed through a specific map, such as a compliance map, then processed through an actual map
Data is received from trading partners that have not been set up or linked with this map
This option allows the data to be processed when no valid trade agreement is in the trading partner database for this data set.
Leave the Overwrite Output User Files box blank. Compliance maps do not produce user files.
The Ignore Trading Partner Mailbox, Ignore Trade Agreement Mailbox and Validate Control Number Sequence boxes are significant only for routing EDI. Selecting any of the three affects the location of the EDI output of the map.
For testing purposes, select these check boxes so that transactions containing data that fails compliance are written to the bad0.edi file in the maps directory and not to the mailboxes.
For production purposes, clear these check boxes so that the pass/fail data is placed in the GOOD/BAD mailboxes.
Select Short Trace as the Trace Type.
Short Trace produces a listing of only the errors that ECMap encountered during mapping or displays the message:
Map run complete. No errors detected.
To see more detail, run the map with Long Trace as the Trace Type.
Route EDI Type is not an available option for compliance maps. EDI Out is always the default choice for compliance maps.
Ignore Run Inbound Map.
Type or browse to a value in the Populate the Company Identification text box to associate a specific company profile with this map.
![]() If you click Browse, the Select Company ID screen displays
a list of the company profiles available. Double-click a profile,
and the program enters the profile number associated with the profile
in this text box.
If you click Browse, the Select Company ID screen displays
a list of the company profiles available. Double-click a profile,
and the program enters the profile number associated with the profile
in this text box.
The Max Memory Cross Reference text box contains the maximum allowable number of entries in a cross-reference table for memory lookups, with a default of 10,000 entries.
If the entries in any single table exceed the number entered in this text box, then that table is not stored in memory and the lookups for that table go to disk.
![]() This option is ignored when the RTP is run on a UNIX
machine, where all tables are stored in memory.
This option is ignored when the RTP is run on a UNIX
machine, where all tables are stored in memory.
Start Processing at Byte Count is used to designate the specific character (byte) at which processing of the incoming EDI file begins. When only specific portions of large data files need to be processed, this option saves the time of reading through the preceding data.
End Processing at Byte Count is used to designate the specific character (byte) at which processing of the incoming EDI file ends. When only specific portions of large data files need to be processed, this option saves the time of reading through the subsequent data.
Click the Option 2 tab of the Run Inbound Map window to make it active, and identify the following information:
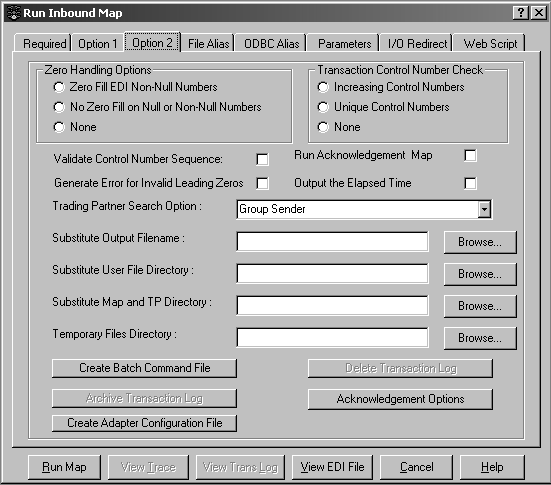
Compliance maps assume that Zero
Fill EDI Non-Null Numbers is selected. When selected, the program
fills with zeroes incoming numeric elements that are not blank.
This is the -z switch on the command
line.
Select the Create Bad Transaction Log box.
WARNING! You must select this check box to create the file that contains failed translation data.
To save the elapsed time of the run into a trace file, select Output the Elapsed Time box. This is an option only when you use Short Trace.
To optionally create 997 information, select the Run Acknowledgement Map check box. The Build Acknowledgement window displays.
The Trading Partner Search Option specifies which sender and receiver fields in the incoming EDI envelopes the trading partner lookup uses. See the ECMap User’s Guide for more detailed information on this option.
Ignore the Substitute Output Filename. It is not applicable for compliance maps since they do not produce an output file.
Ignore the Substitute User File Directory. It is not applicable for compliance maps since they do not produce an output file.
Ignore the Substitute Map and TP Directory. It is not specific to compliance maps.
Ignore the Temporary Files Directory field.
Click Create Batch Command File to create a batch command file that automatically runs the map once you have set all the switches and options.
Click Delete Transaction Log to create a new log of compliance data that is related only to the map you are currently running.
![]() This option is valid for the expanded text log. If you
are testing with the ODBClog, you must manually delete rows in the
TRLOG table during testing.
This option is valid for the expanded text log. If you
are testing with the ODBClog, you must manually delete rows in the
TRLOG table during testing.
Delete Transaction Log permanently removes the contents of the transaction log file. Since new entries to the transaction log are appended to existing entries, rather than overwriting them, it is important to control the size of this log by periodically purging the contents. If you want to save the contents of the log, you should archive it prior to deleting it. Once you have deleted the log, you cannot recover it. You receive no message saying that the log has been deleted.
Click Acknowledgement Options only to modify existing acknowledgement options or to view the output generated from a run with acknowledgements.
You are now ready to run data through the compliance map. Click Run Map.
