![]()
![]()
![]()
![]()
Sybase HIPAA Accelerator 6.0 provides two capabilities to facilitate the upgrade process: An import rule capability helps you easily update maps and import rules, and an import XREF utility let you import cross-reference tables from one map to another.
In addition to updating rules, you can modify cross-reference tables. For example, you can add tables to maps to handle certain situations or add values to a table supplied in the compliance map, such as inpatient/outpatient edits in the 837 Institutional map. See “Validating maps against National Employer ID values”.
Sybase HIPAA Accelerator 6.0 supplies a cross-reference utility that facilitates importing tables from one map to another.
![]() Importing cross-reference
tables from one map to another
Importing cross-reference
tables from one map to another
ECMap must be installed on the machine where you use the cross-reference utility, which works with any version of ECMap.
Navigate to the \Tools folder in your Sybase HIPAA Accelerator install directory; for example, C:\Program Files\Sybase\HIPAA52\Tools, and double-click XrefImport.exe to launch the application.
Select the location of the source cross-reference tables by browsing to the directory where the map resides (where the tables will be imported from). For example, if you are upgrading from Sybase HIPAA Accelerator 5.0.x to 5.1, your source is the location of the version 5.0.x map.
You select one map at a time.
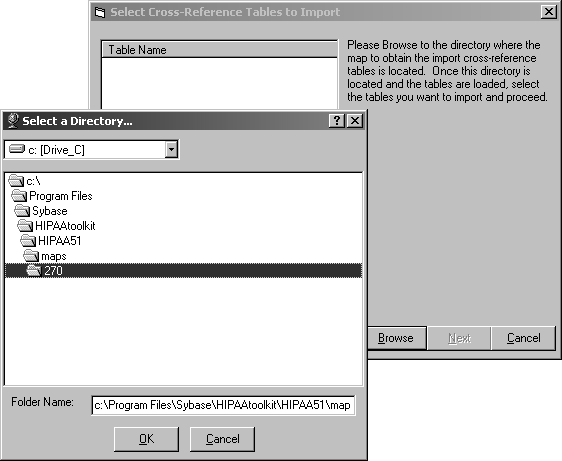
Double-click the directory and a list of cross-reference tables defined for that map displays.
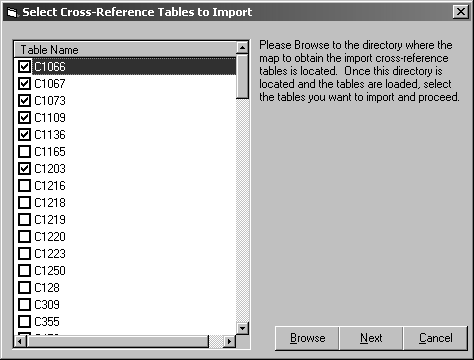
Check the tables you want to import and click Next.
The Select Map for Table Import screen opens and displays a list of your projects and maps.
Open a project and select your destination map (where the tables will be imported to). In the case of the upgrade mentioned in step 2, the map you select is the 6.0 version of the Sybase HIPAA Accelerator map.
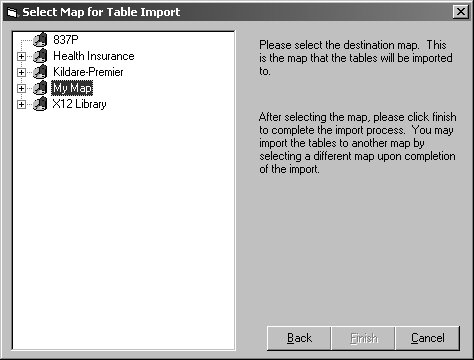
Click Finish to import the tables. The import process runs.
If the import table already exists in the destination map, a prompt displays asking if the import table should overwrite the current table. Click Yes to overwrite.
When the window opens that indicates the process is complete, click OK to continue.
You can begin working with your new map, or you can do one of the following:
Import the current set of tables to another map by selecting that map on the Select Map for Table Import screen.
Select a new set of tables from the Select Cross-Reference Tables to Import window and return to the Select Map for Table Import Window.
Select a different source and import those tables following the same steps.
If you import a table to a map and the table did not exist previously, update the map to use the new table by linking it to the appropriate element or rule.
![]() ECMap users can also access the cross-reference
feature through the ECMap Utilities menu. See the ECMap
User’s Guide for details.
ECMap users can also access the cross-reference
feature through the ECMap Utilities menu. See the ECMap
User’s Guide for details.
