Before you upgrade to Enterprise Portal 6.0, perform these pre-upgrade steps.
You must have upgraded to EAServer 4.2.2 prior to running the upgrade. See “Upgrading to EAServer 4.2.2”.
Adaptive Server Enterprise must be running before performing the upgrade. See “Starting Adaptive Server Enterprise”.
Back up your existing Enterprise Portal installation (5.0, 5.0.x, 5.1, or 5.1.1).
Back up the following portal databases. You must shut down EAServer, back up the databases, then restart EAServer. See “Starting and stopping EAServer”.
portalsearchdb – search database
portaldatabase – portal database
entldb – Enterprise Security Access Control Database (ACDB)
![]() To ensure a successful restoration, create separate
dump devices for each database.
To ensure a successful restoration, create separate
dump devices for each database.
Refer to your Adaptive Server Enterprise documentation for information about backing up databases.
Back up your EP 5.0, 5.0.x, 5.1, or 5.1.1 $SYBASE/PortalSearch-5_0 directory, then stop and restart the Portal Search and Autoindexer processes or services. Refer to your Enterprise Portal 5.x documentation for instructions on starting and stopping services.
Verify that the acdbData and acdbLog devices exist. From the isql 1> prompt, enter:
select * from master.dbo.sysdevices
go
If the devices are not listed, you must create them. The acdbData device must have a size of at least 100MB, and the acdbLog device must have a size of at least 25MB.
For example, to create the acdbData device, at the 1> prompt, enter:
disk init name=“acdbData”, physname=“/work/sybase/data/acdbData.dat”, size=“51200,”
VDEVNO=10
go
Verify that the $SYBASE environment variable is set to the Sybase installation directory where EAServer, PortalStudio, and PortalSearch are installed.
In a terminal window, enter:
echo $SYBASE
If not set, set $SYBASE.
For example, if you have EAServer and the portal software installed in /work2/sybase, you would enter:
setenv SYBASE /work2/sybase
Verify that the $JAGUAR environment variable is set to $SYBASE/EAServer.
In a terminal window, enter:
echo $JAGUAR
If $JAGUAR is not set, enter:
setenv JAGUAR $SYBASE/EAServer
Verify that you have write permission on your login home directory and the directory where you install the software.
Verify that there is a (“.”) dot in the PATH environment variable. In a terminal window, enter:
echo $PATH
If there is no dot in the PATH environment variable, add it
Create a CLASSPATH that lists only the current directory.
In a terminal window, enter:
setenv CLASSPATH
![]() You need to perform this step only if you
are going to install the Content Explorer. If you do not want to
install Content Explorer, or if you are upgrading from EP 5.1 and
already installed Content Explorer, this step is unnecessary.
You need to perform this step only if you
are going to install the Content Explorer. If you do not want to
install Content Explorer, or if you are upgrading from EP 5.1 and
already installed Content Explorer, this step is unnecessary.
Verify that an iiop port exists in EAServer. If not, define one.
Start EAServer.
In a terminal window, enter:
$JAGUAR/bin/serverstart.sh
Start Jaguar Manager. See “Starting Jaguar Manager”.
From Jaguar Manager connect to the Jaguar server.
In the Jaguar Manager tree view, select Jaguar Manager | Servers | Jaguar Listeners.
Verify that an iiop port exists.
If the iiop port exists, go directly to the next step.
If the iiop port does not exist, right click the Listeners folder in the tree view, select New Listener from the pop-up and continue with this procedure.
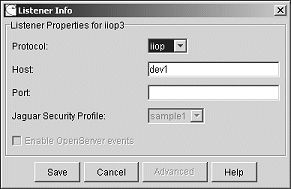
When the New Listener dialog box appears, enter the listener name and click Create New Listener.
When the Listener Info dialog box displays, complete the fields:

Protocol – select “iiop”.
Host – this field displays the name of the machine where this Jaguar server is installed.
Port – enter 9000.
Click Save, then exit Jaguar Manager.
Verify the machine name where Enterprise Portal 5.0, 5.0.x, 5.1, or 5.1.1 is installed.
In a terminal window, enter:
uname -a
The machine name displays.