![]()
![]()
![]()
![]()
This section describes how to configure a basic Adaptive, Backup, Monitor, XP Server. For information on advanced configuration topics, localization, and enabling additional functionality, see Configuring Adaptive Server Enterprise.
The Studio Installer sets all the necessary environment variables to perform the configuration of Sybase servers. If your environment gets corrupted, the Studio Installer generates script files that you can run to correct the environment after the installation. If you need to correct the environment, run the following scripts as the “root” user.
If you are using a Bourne shell, run:
$ . SYBASE.sh
If you are using a C shell, run:
% source SYBASE.csh
When you log in as “sybase” for the first time after installation, verify that the SYBASE environment variable is correctly set and that $SYBASE/$SYBASE_ASE/bin and $SYBASE/$SYBASE_OCS/bin are in your search path.
![]() Configuring Adaptive Server
Configuring Adaptive Server
The Studio Installer automatically begins the configuration process.
Enter the Sybase directory for this configuration. By default the installation directory displays.
Click Next.
The Build or Upgrade Adaptive Server, Backup Server, and Monitor Server screen is displayed. From the drop-down list, select Build new servers.
The srvbuild screen displays.
Only the server types that were installed display on the srvbuild screen. For example, if you did not install Monitor Server, it does not appear on the srvbuild screen.
Figure 4-1: Server selection screen
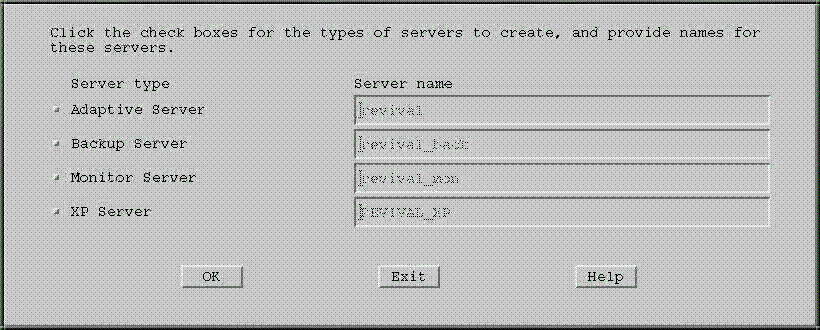
Select, at a minimum, Adaptive Server. Click the check box to the left of the server name.
You can choose all server types at once or any combination of server types.
srvbuild consecutively displays the attributes screen for each server you choose, in the order listed on the screen. For example, if you chose Adaptive Server, Backup Server, and XP Server, but did not select Monitor Server, the attribute screen for Adaptive Server appears first. When you finish choosing the attributes for Adaptive Server, and click OK, the Backup Server attribute screen appears. When you are finished with that screen, the XP Server attribute screen appears. The Monitor Server attribute screen does not appear because you did not check the box for installing that product.
Click OK.
Provide a name for each server you install.
![]() Do not change the name of your Backup Server.
Do not change the name of your Backup Server.
srvbuild provides a default server name using the name of the machine you are installing on. You can change the default name.
Server naming conventions are as follows:
The name should not exceed 30 characters.
The initial character must be a letter.
The characters that follow must be letters, numbers, or underscores (_).
Characters not allowed are: control characters, spaces, ampersands (&), asterisks (*), periods (.), and question marks (?).
Use a name that is descriptive of your intended use and unique to your network.
Use the extensions (“_back”, “_mon”, “_XP”) to relate other server types to Adaptive Server.
The XP Server name must be all uppercase, followed by an underscore ( _ ) and the two-letters “XP”. Although srvbuild does this for you automatically, you should be aware of this requirement in case you need to modify the XP Server name in the interfaces file.
All server names are stored in the interfaces file by srvbuild and are used by clients and other servers to establish communication.
Click OK.
From the drop-down list at the top of the Adaptive Server attribute screen, select the logical page size for this installation of Adaptive Server. All pages in this installation will have the logical page size you specify here. If this installation of Adaptive Server has a logical page size of 2K, and you decide that you want a logical page size of, for example, 8K, you must create a separate installation of Adaptive Server with the 8K page size.
The size of the master database is automatically allocated to accommodate the logical page size. You can increase the master database size if you want.
If you are adding additional server languages for localization, you need an additional 2–7MB of space, per language in the master database. See Chapter 2, “Installation Requirements” for language module sizes.
For production systems, Sybase recommends that you use a disk partition instead of an operating system file, for the master device. This example specifies a raw partition:
/dev/rdsk/disk_partition
If you entered a disk partition as the master device, only the master device can occupy the disk partition. Set the size of the partition to the recommended 30MB.
If you entered an operating system file for the location of the master database, you can provide a size that is less than the default size, but the minimum allowable size is 25MB. The maximum size is the size of the file system, up to 2GB.
Provide an operating system file for the master and sybsystemprocs device paths:
/op_system_dir/master.dat
/op_system_dir/sybsystemprocs.dat
where op_system_dir is the name of the operating system directory you are going to use.
![]() sysprocsdev is the default system
name for this device. However, it is frequently referred to as the sybsystemprocs device,
as in the Adaptive Server attribute screen, since it stores the sybsystemprocs database.
sysprocsdev is the default system
name for this device. However, it is frequently referred to as the sybsystemprocs device,
as in the Adaptive Server attribute screen, since it stores the sybsystemprocs database.
Sybase recommends that the sybsystemprocs device be located on a device separate from the master device. The sybsystemprocs database usually increases in size from version to version.
Provide an error log path name.
The default is:
$SYBASE/$SYBASE_ASE/install/errorlog
For Directory Services, specify the transport type, host name, and port number.
These entities define how servers and clients find and communicate with each other on the network. srvbuild adds this entry to the interfaces file during the installation process.
Transport type – the menu provides a list of network protocols supported by Sybase. TCP is the default. Some network protocols in the menu may not be valid for your platform. Check with your operating system administrator.
Host name – do not change the host name. The host name is the machine name where you are installing Adaptive Server.
Port number – if you did not change the default protocol, the port number displayed is the first available port address. The port number you specify cannot be used for any purpose other than running Adaptive Server.
If you change the default port number, verify that the new port is not in use.
To verify that a port number is available, use:
netstat -a |grep port_number
where port_number is the number you are checking. If this command does not return any results, the port number is not in use.
If you selected a protocol other than the default, you may not be able to use the first available port number supplied. Check with the operating system administrator to see what port numbers are available.
![]() If you want to use lightweight directory services for
server connections instead of the interfaces file,
see Configuring Adaptive Server Enterprise for
your platform.
If you want to use lightweight directory services for
server connections instead of the interfaces file,
see Configuring Adaptive Server Enterprise for
your platform.
Click Edit Advanced Adaptive Server Attributes if you want to:
Specify a sybsystemdb device path for the sybsystemdb database. See the Configuring Adaptive Server Enterprise.
Place shared memory files in a directory other than the default location under $SYBASE/$SYBASE_ASE.
Change your default Backup Server.
To create the server, click Build Server. To continue configuring other Sybase servers, select OK.
srvbuild displays a Status Output screen that shows the status of the various installation tasks as they execute.
![]() Configuring Backup Server
Configuring Backup Server
This procedure assumes that you have completed the “Pre-installation tasks”.
The related Backup Server name is provided by default. It is the same name as the Adaptive Server with the extension “_back”. This is the name of the Adaptive Server that will use this Backup Server.
Provide the Sybase System Administrator (SA) user name for the related Adaptive Server, or accept the default value.
If the related Adaptive Server is created in the same srvbuild session as Backup Server, this field does not appear.
Provide the Adaptive Server SA password. This is the password for the related Adaptive Server.
If the related Adaptive Server is created in the same srvbuild session as Backup Server, this field does not appear.
Provide an error log path for Backup Server.
Provide a location for the tape configuration file.
Backup Server reads this file when a dump command is issued, to determine the device type and characteristics of the dump device specified in the dump command. Having access to this information speeds up the dump (recovery) process.
Specify the language you want Backup Server to use for its error messages. The default language is U.S. English.
The language available depends on which language modules were installed on your system. By default, all character sets are copied from the CD when performing a standard or full install.
Specify the character set you want Backup Server to use.
The default character set is iso_1.
Other options are:
cp850: Code Page 850 (Multilingual) character set
cp437: Code Page 437 (United States) character set
mac: Macintosh default character set for Western European locales
ISO 8859-1 (Latin-1) Western European 8-bit character set
UTF-8 character set
Specify the maximum number of network connections.
This option specifies the total number of network connections available if you are backing up or restoring a database over the network to a remote Backup Server.
This option is not necessary if you are backing up to the default Backup Server, which is local. Set to 0.
Specify the maximum number of server connections. You can accept the default or change it.
This option specifies the number of server connections to Backup Server. Backup Server requires at least:
Two connections for each dump operation
One connection for each load operation
One connection for volume change messages
Allow a maximum of three times the number of expected concurrent dump and load sessions.
For the Directory Services, specify the transport type, host name, and port number.
These entities comprise the interfaces file entry. This entry defines how Backup Server and Adaptive Server find and communicate with each other on the network. srvbuild adds this entry to the interfaces file during the installation process.
Transport type – the menu provides a list of network protocols supported by Sybase. TCP is the default. Some network protocols on the menu may not be valid for your platform. Check with your operating system administrator.
Host name – the host name is the machine name where you are installing Backup Server.
Port number – if you did not change the default protocol, the port number displayed is the first available port address.
The port number you specify cannot be used for any purpose other than Backup Server.
If you change the default port number, verify that the new port is not already in use. Check with your operating system administrator.
If you selected a protocol other than the default, you may not be able to use the first available port number. Check with the operating system administrator to see what port numbers are available.
Click OK.
![]() Configuring Monitor Server
Configuring Monitor Server
This procedure assumes that you have completed the “Pre-installation tasks”.
If you selected Monitor Server to be installed, the Monitor Server attribute screen displays.
Provide the related Adaptive Server name. This field does not appear if the related Adaptive Server is created in the same srvbuild session as Monitor Server.
This is the name of the Adaptive Server that Monitor Server will be monitoring.
Specify the Sybase System Administrator (SA) user name. This field does not appear if the related Adaptive Server is created in the same srvbuild session as Monitor Server.
This option is required unless the USER environment variable is set.
This name specifies the Monitor Server superuser. It must be a valid login account for the Adaptive Server to be monitored. For production systems, Sybase recommends that you use the “sa” or “sybase” user account as the Monitor Server superuser.
Monitor Server uses the superuser account to connect to Adaptive Server to run special stored procedures and to verify shutdown requests that can be performed only by the superuser.
Provide the Adaptive Server SA password. This is the password of the Monitor Server superuser. This field does not appear if the related Adaptive Server is created in the same srvbuild session as Monitor Server.
If you omit the password, Monitor Server prompts for a password during start-up.
Determine the maximum number of connections allowed to Monitor Server. Valid values are 1–20.
A connection to Monitor Server can be any of:
A monitor in Sybase Central,
An active Historical Server session or a scheduled Historical Server recording session, or
A connection to Monitor Server from a Monitor Client-Library application.
For example, if a user starts a Historical Server recording session, and another user opens the Performance Summary Monitor in Sybase Central, two connections to Monitor Server are used. If Monitor Server is configured for five connections, there are only three more connections available.
Specify the error log path.
This is the path name of the Monitor Server log file, where informational and error messages are logged.
The default location is the directory from which Monitor Server is started and the error log name is servername_mon.log, where servername is the name of the server.
Specify the path of the configuration file.
This is the path name of the Monitor Server configuration file. A default configuration file is not provided. This file is optional, but if specified, the values in the configuration file override the default runtime parameters that are otherwise used by Monitor Server.
Specify the shared memory directory, where the servername.krg shared memory file is located and servername is the name of the Adaptive Server.
If you omit this parameter, Monitor Server looks for the shared memory in the $SYBASE/$SYBASE_ASE directory.
If you did not change the default location while configuring the Adaptive Server, the default value is correct. Otherwise, use the value you specified for the server.
For the Directory Services, specify the transport type, host name, and port number. These entities comprise the interfaces file entry. This entry enables Monitor Server and Adaptive Server to find and communicate with each other on the network. srvbuild adds this entry to the interfaces file during the installation process.
Transport type – the menu provides a list of network protocols supported by Sybase. TCP is the default. Some network protocols in the menu may not be valid for your platform. Check with your operating system administrator.
Host name – the host name is the machine name where you installed Monitor Server.
Port number – if you did not change the default protocol, the port number displayed is the first available port address.
The port number you specify cannot be used for any purpose other than installing the Monitor Server.
If you change the default port number, verify that the new port is not already in use.
To verify that a port number is available, use:
netstat -a |grep port_number
where port_number is the number you are checking. If this command does not return any results, the port number is not in use.
If you selected a protocol other than the default, you may not be able to use the first available port number. Check with the operating system administrator to see what port numbers are available.
Click OK.
![]() Configuring XP Server
Configuring XP Server
If you selected XP Server to be installed, the XP Server Attribute Editor screen displays.
Provide the related Adaptive Server name, which is the name of the Adaptive Server that will be using XP Server. If the related Adaptive Server is created in the same srvbuild session as XP Server, this field does not appear.
![]() The XP server name must be in all capital letters, and
must follow the format ASE-NAME_XP.
The XP server name must be in all capital letters, and
must follow the format ASE-NAME_XP.
Provide the Sybase System Administrator (SA) user name for the related Adaptive Server, or accept the default value.
If the related Adaptive Server is created in the same srvbuild session as XP Server, this field does not appear.
Provide the related Adaptive Server SA password.
If the related Adaptive Server is created in the same srvbuild session as XP Server, this field does not appear.
For the Directory Services, accept the default values provided.
Click Build Servers.
srvbuild displays a Status Output screen that shows the status of the various installation tasks as they execute.
When the installation is complete, the Status Output screen displays “Done”. Click Exit to return to the main window. Click Exit, again.
