![]() Configuring Adaptive Server
Configuring Adaptive Server
Select Yes when the Studio Installer prompts: “OK to configure component Adaptive Server Enterprise?”
![]() If you select No, the Studio Installer exits. You can
complete the installation by invoking %SYBASE%\%SYBASE_ASE%\bin\syconfig.exe.
If you select No, the Studio Installer exits. You can
complete the installation by invoking %SYBASE%\%SYBASE_ASE%\bin\syconfig.exe.
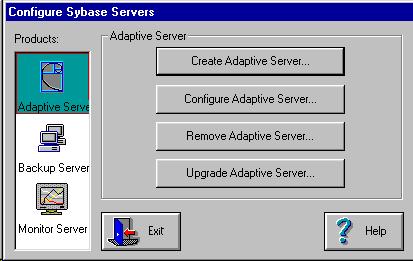
Select Adaptive Server from the Products icons on the left.
Figure 4-1: Configuring Sybase servers

Click Create Adaptive Server.
The Adaptive Server name is generated and supplied from the server machine ID.
WARNING! Backup and XP Server do not allow hyphens in the name. Since XP and Backup Server names are automatically created from the Adaptive Server name, you must remove any hyphens before proceeding.
Click Continue.
Select the logical page size for this installation. Valid options are 2K, 4K, 8K, and 16K.
Specify the size and location of the master device, master.dat.
The default is based on the logical page size. The minimum allowable size is 25MB.
The default directory is: %SYBASE%\data\master.dat.
Specify the size and location of sybsystemprocs.dat. The default value of 100MB is the minimum required and the recommended size. Because the sybsystemprocs database is constantly increasing in size, this allows enough space on the device for growth.
Select Network Connection and click Add.
Enter a valid IP address, or the server name and port number.
Click Continue.
Provide an error log path name. The default is:
%SYBASE%\%SYBASE_ASE%\install\errorlog
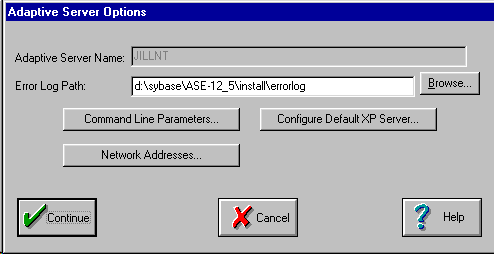
From this window, you must also configure the XP Server. Select Configure Default XP Server.
Figure 4-2: Adaptive Server options

You can select either System Account (default) or This Account. To enable MAIL support in Adaptive Server, you must select This Account, change the NT account from LocalSystem to a valid account, and provide a password. See the Adaptive Server Configuration Guide.
Select Network Address. This launches the network connection information screen.
A valid network IP address or host_name and port_number is required to complete the installation and configuration of Sybase servers. For example:
machine_name port_number
or,
machine_name,port_number
![]() Beginning with version 12.5, Adaptive Server accepts
TCP connection formats on Windows platforms. See Chapter 6, “Installing Sybase PC-Client Products.”
Beginning with version 12.5, Adaptive Server accepts
TCP connection formats on Windows platforms. See Chapter 6, “Installing Sybase PC-Client Products.”
Provide an error log path name.
The default is:
%SYBASE%\%SYBASE_ASE%\install\errorlog
From this window, you can also set command-line parameters. Command-line parameters set parameters for every instance of the server.
When you complete the setup process, click Continue.
This returns you to the Configure Sybase Servers screen where you can select Monitor Server or the Backup Server icons to continue the installation process.
You can set up servers to start automatically. For details, see Chapter 7, “Starting and Stopping Servers.”
![]() Configuring Backup Server
Configuring Backup Server
This procedure assumes that you have completed the “Pre-installation tasks”.
Select Backup Server from the icons on the left, and select Create Backup Server. The Backup Server attribute screen displays.
The related Backup Server name is provided by default. It is the same name as the Adaptive Server with the extension “_BS”. This is the name of the Adaptive Server that will use this Backup Server.
Click Continue.
Provide an error log path for Backup Server.
Specify the language you want Backup Server to use for its error messages. The default language is U.S. English.
The language available depends on which language modules were installed on your system. By default, all character sets are copied from the CD when performing a standard or full install.
Specify the character set you want Backup Server to use.
The default character set is cp850.
Other options are:
cp437: Code Page 437 (United States) character set
mac: Macintosh default character set for Western European locales
ISO 8859-1 (Latin-1) Western European 8-bit character set
UTF-8 character set
Click Network Addresses.
Click Add.
Enter a valid IP address and a unique port number.
Click Continue.
The installer displays the message “The New Backup Server Configuration is Finished.” Click Continue.
Do one of the following:
Select Monitor Server from the Server Configuration screen.
Click Exit to exit the configuration utility.
![]() Configuring Monitor Server
Configuring Monitor Server
This procedure assumes that you have completed the “Pre-installation tasks”.
Select Monitor Server from the icons on the left, then select Create Monitor Server.
The Monitor Server name is provided by default. It is the same name as the Adaptive Server with the extension “_MS”.
Provide an error log path, or accept the default.
If the Monitor Server is created in the same configuration session as Adaptive Server, you do not have to specify additional network addresses.
If you create a new Monitor Server that does not correspond with an Adaptive Server, you must add a network connection. Click Network Addresses.
Click Add.
Enter a valid IP address and a unique port number.
Click Continue.
Click Continue. The installation program:
Creates the %SYBASE%\ directory structure and places files in the appropriate subdirectories
Starts Adaptive Server
Creates the master and system procedures device files
Installs system stored procedures
Installs jConnect metadata and stored procedures
Sets permissions
Installs the language modules
Adds entries to the Windows NT Registry
Shuts down the server
When the process is completed, the FINISHED window displays. The 2.4MB of disk space used by the installation program for temporary files is released when installation is complete.
![]() Configuring EJB Server
Configuring EJB Server
You can modify the port number in the file, %SYBASE%\%$SYBASE_EJB%\Repository\Listener\EJBServer_iiops.props.
Enter a valid port number, and click Next.
The utility displays the message: “Configuration of Installed Products is Complete.” Click OK.
The utility displays the message: “Install Complete.” Click OK.
Adaptive Server and related products have been successfully installed, and minimally configured for use. See “Installing sample databases”, to begin experimenting with your servers, or see the System Administration Guidehttp://www.sybase.com/support/manuals for more advanced topics.
You have a running server, as well as various system databases and system tables. Some references that may help you get started using your new Adaptive Server are:
“Initializing Database Devices” and “Creating User Databases” in the System Administration Guide for information about creating an Adaptive Server user database and its devices
Transact-SQL User’s Guide to learn how to write queries
For information on developing a backup and recovery plan and backing up and restoring user databases, see the System Administration Guide.
Monitor Server requires some additional configuration after installation. See the Adaptive Server Enterprise Monitor Server User’s Guide.
For information on using extended stored procedures, see the Transact-SQL User’s Guide.