Portal Studio lets you control the layout of a page, offering a variety of column widths and the ability to customize individual cell widths.
![]() Portal Interface users can change the layout only of
their personal pages; they cannot change the layout of system or
catalog pages created in Portal Studio.
Portal Interface users can change the layout only of
their personal pages; they cannot change the layout of system or
catalog pages created in Portal Studio.
A portal page can have these layouts:
100 – the content occupies 100% of the Portal Interface browser window.
30/70 – 2 columns, with one column occupying 30% of the browser window, and the other column occupying 70%.
25/50/25 – 3 columns, with one column occupying 25% of the browser window, the center column occupying 50%, and the last column occupying 25%.
50/50 – 2 columns with each column occupying 50% of the browser window.
WARNING! The page layout can display incorrectly if a user has not been assigned a role to view some of that page’s portlets. The user may see only some of the pages portlets and cannot change the layout. You may want to keep this in mind when choosing a layout for pages that contain portlets that have been assigned different access permissions.
![]() Changing
a page’s layout
Changing
a page’s layout
To change a page’s layout, click a different layout choice. The selected layout displays in the page representation on the right side of the Page Builder.
In a 30/70, 25/50/25, or 50/50 layout, click the portlet box in the page representation and drag and drop the portlet from one side of the layout to the other.
Click Save.
Click Close to exit the Page Builder.
![]() Creating a three-column page
Creating a three-column page
Log in to Portal Studio, select Build | Pages, then click New.
The default page layout of two equally wide columns displays.
Click the three-column Layout button.
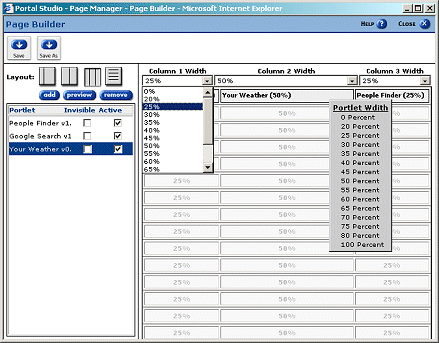
The page switches to a three-column layout, with a default column percentage width of 25/50/25.
Click Add to begin adding portlets.
![]() A three-column layout supports a maximum of 15 rows,
which lets you add a maximum of 45 portlets to a page.
A three-column layout supports a maximum of 15 rows,
which lets you add a maximum of 45 portlets to a page.
After you finish adding portlets, change the default column and portlet widths to suit your needs.

To change the width of a column, click the Column Width drop-down list above each column. To change the width of one portlet, right-click the portlet and select the width from the pop-up.
![]() Once you set a custom cell width, the Column Width drop-down
lists disappear. To redisplay the drop-down lists, click the three-column
layout icon again.
Once you set a custom cell width, the Column Width drop-down
lists disappear. To redisplay the drop-down lists, click the three-column
layout icon again.
Both column widths and portlet widths are specified in percentages of the page width. For example, the default width of 25% means that the column or portlet occupies 25 percent of the width of the page.
If you change the page layout from 3 columns to 2 columns on a page with 30 or fewer portlets, or move to one column from 2 or 3 columns on a page with 15 or fewer portlets, the portlets are randomly rearranged.
For example, if your page layout is like this:
A |
B |
C |
D |
E |
F |
G |
H |
I |
and you remove the third column, the resulting two-column page looks like:
A |
B |
D |
E |
G |
H |
C |
F |
I |
The total percentage of cell widths in a row must equal 100%.
You can also set a column width to zero. This allows you to simulate having a row with only one or two columns, or lets you create two-column layouts with column widths other than 50/50 or 30/70.
When a user logs in to Portal Interface, they see the portlets laid out in the selected configuration.