![]()
![]()
![]()
![]()
Some enterprises may have a distributed EP installation; that is, a Portal Studio and Portal Interface installation on one file system and another Portal Studio and Portal Interface installation on a remote file system.
In this scenario, you can deploy Portal Studio objects to another server.
![]() Pushing portal objects to a remote server
Pushing portal objects to a remote server
Log in to the Portal Studio as a user associated with a role—StudioAdmin, PortalAdmin—that has permission to perform all operations.
Select Build | Portlets from the Portal Studio left pane.
Click Deploy on the Portlet Manager toolbar. You see the Portal Studio–Deploy window and the Deploy tab.
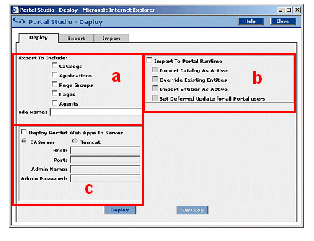
The window has three sections:
Export to Include – exports portal object metadata to an XML file. Export also bundles the Web archive (WAR) files that contain Web applications required by the portlets you export. The export function on the Deploy tab then creates an enterprise archive (EAR) file that contains the XML file and WAR files (the export function on the Export tab only creates the XML file).
![]() The WAR file must be manually packaged or exported from EAServer
and placed in the /tmp/upload directory
to be included in the EAR file. By default, the upload directory
is /tmp/upload on UNIX and x:\tmp\upload on
Windows.
The WAR file must be manually packaged or exported from EAServer
and placed in the /tmp/upload directory
to be included in the EAR file. By default, the upload directory
is /tmp/upload on UNIX and x:\tmp\upload on
Windows.
Import to Portal Runtime – loads the metadata from the XML file to the remote Portal Studio database. The XML is extracted from the EAR file.
Deploy Portlet Web Apps in Server – deploys Web archive (WAR) files found in the enterprise archive (EAR) file. The WAR files contain Web applications invoked by any of the portlets you are exporting, and places them in an enterprise archive (EAR) file. The system runs the necessary processes to deploy the WAR file on the remote application server.
You can run:
(a), (b), and (c) together
(a) alone
(b) alone as long as you have the name of the EAR file from (a)
(c) alone as long as you have the name of the EAR file from (a)
(a) and (b) together
(a) and (c) together
(b) and (c) together
Complete these fields:
Export To Include – select or deselect the objects to export: Catalogs, Applications, Page Groups, Pages, and Agents.
File Name – enter the name and location of the EAR file to which you want to export objects.
Import To Portal Runtime – import the XML portion of the EAR file into an instance of the Portal Interface on the remote application server.
Import Catalog As Active – make the imported catalog the default display catalog. The imported XML document can contain more than one catalog, but only one catalog is marked as the default display catalog—approved and active. If you import this catalog as active, it deactivates the current default catalog and replaces it with the new catalog.
Override Existing Entities – have imported pages override (receive a later version number) existing pages with the same name.
Import Entities As Active – import the new entities as active, which makes the imported entities available to Portal Interface users.
Set Deferred Update For All Portal Users – indicates whether to notify all portal users of a change in the portal content so that they can refresh their view the next time they log in to the portal.
![]() During the import, if you do not select Set Deferred
Update For All Portal Users, the Portal Interface user has to perform
an Update for each guest page or guest page group.
During the import, if you do not select Set Deferred
Update For All Portal Users, the Portal Interface user has to perform
an Update for each guest page or guest page group.
Deploy Portlet Web Apps In Server – have the system expand the EAR file on the remote server, extract the WAR file, and run the necessary processes to deploy the WAR file on the remote application server.
When you select Deploy Portlet Web Apps In Server, complete these options:
EAServer/Tomcat – the type of application server running on the remote installation.
Host – the host name of the remote application server.
Port – the port number of the remote application server.
Admin Name – the system administrator user name used to access the remote application server.
Admin Password – the system administrator password used to access the remote application server.
When you finish, click Deploy.
When a prompt states that the operation was successful, click OK.
Click View Log to review the deploy operation’s activities.
Click Close to exit the Portal Studio–Deploy window.
You should be able to see the deployed objects in the Portal Studio and Portal Interface remote installation.
