If you installed multiple versions of the .NET Framework on the target Web server computer, you should make sure that IIS uses the 2.0 version for PowerBuilder .NET Web Forms applications. You can make this change globally, for all ASP.NET Web site applications, or for individual Web Forms applications that you deploy to IIS.
![]() To configure the ASP.NET
version for all new Web sites:
To configure the ASP.NET
version for all new Web sites:
Select Start>Run from the Windows Start menu.
Type “InetMgr” in the Run dialog box drop-down list.
The IIS Manager displays.
In the left pane of the IIS Manager, expand the local computer node and its Web Sites sub-node.
Right-click the Default Web Site node and select Properties from its pop-up menu.
The Default Web Site Properties dialog box displays.
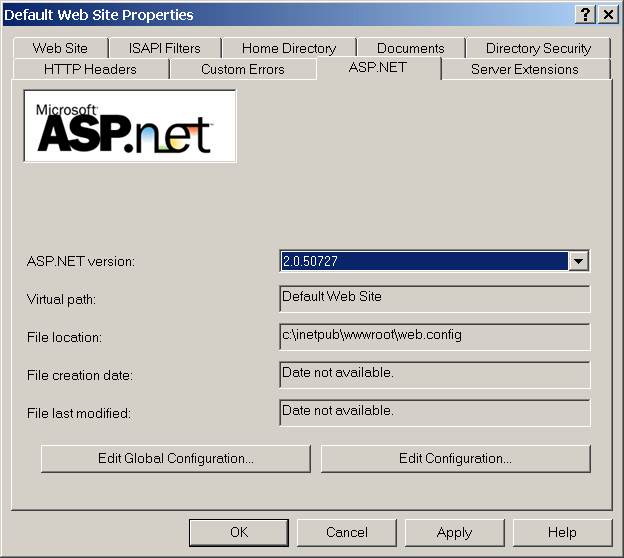
Click the ASP.NET tab of the Default Web Site Properties dialog box and select 2.0.50727 or later for the ASP.NET version.
Figure 1-2: Setting the default ASP.NET version

![]() Changing the ASP.NET version for an existing Web Forms
project
If you have already deployed a PowerBuilder Web Forms project,
you can follow the procedure to configure the ASP.NET version for
all new Web sites, but instead of right-clicking on the Default
Web Site node in step 4, expand the node and right-click on the
.NET Web Forms application that you deployed from PowerBuilder.
Then proceed with step 5.
Changing the ASP.NET version for an existing Web Forms
project
If you have already deployed a PowerBuilder Web Forms project,
you can follow the procedure to configure the ASP.NET version for
all new Web sites, but instead of right-clicking on the Default
Web Site node in step 4, expand the node and right-click on the
.NET Web Forms application that you deployed from PowerBuilder.
Then proceed with step 5.