![]()
![]()
In this lesson, you design a JSF page with a master detail DataWindow. You also associate listener classes to the components on the JSF page.
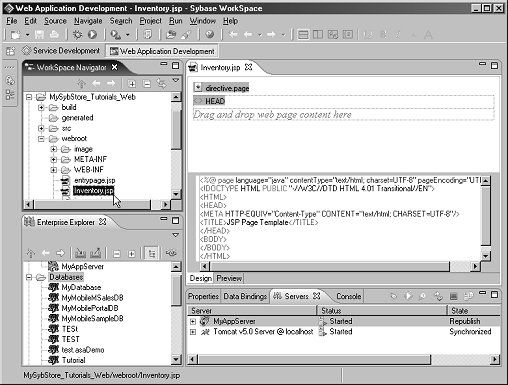
Select File|New|Web Page from the main menu bar to create a new JSP page.
In the New Web Page File wizard,
select MySybStore_Tutorials_Web/webroot as
the parent folder, type Inventory as
the File name, and click Next.

The Select A Template page opens. Select JavaServerPages_Basic from the Available Templates list and click Finish to complete the page creation.
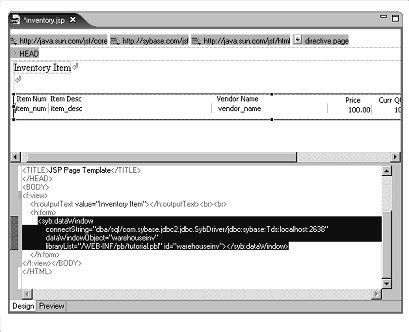
The Inventory page is created and displays in the page editor.
Select Window|Show View|Palette from the WorkSpace main menu. bar
![]() If you do not see Palette on
the list, click Other. When the Show
View dialog box opens, select Basic|Palette and
click OK.
If you do not see Palette on
the list, click Other. When the Show
View dialog box opens, select Basic|Palette and
click OK.
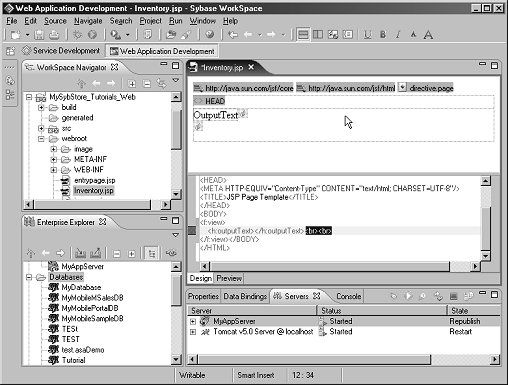
In the Palette, expand JSF
HTML select the OutputText control, and
drag and drop it onto Drag and drop Web page
content here. in the editor.
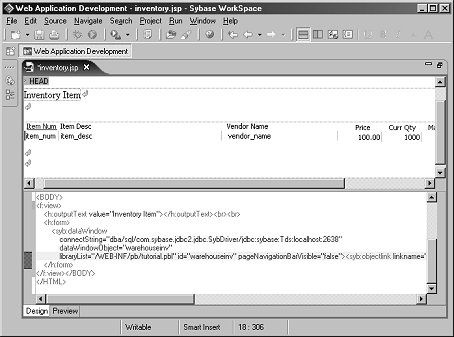
Place the cursor after Output Text in the design pane and press Enter twice to add two break tags (<br>) after Output Text.
Select OutputText in
the page editor, select the Properties tab,
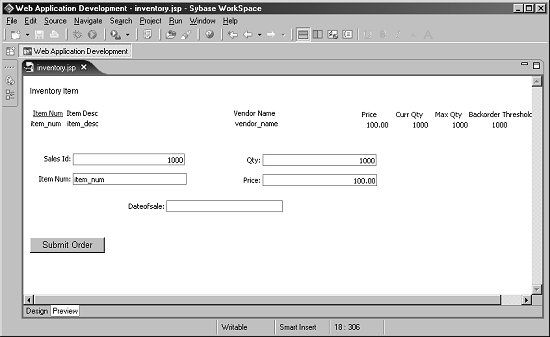
and type Inventory Item in
the Value field.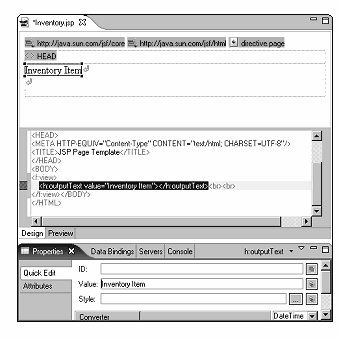
In the WorkSpace Navigator, expand MySybStore_Tutorials_Web/webroot/WEB-INF/pb/tutorial.pbl to display the DataWindows in the tutorial.pbl DataWindow library folder.
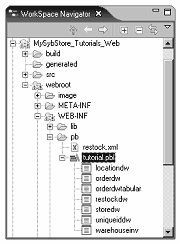
From the DataWindow list, select the warehouseinv DataWindow and drag and drop it onto the page editor below Inventory Item.
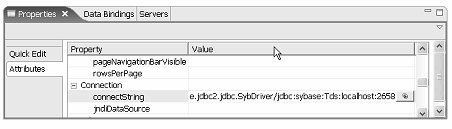
Select the DataWindow in the design page. In the Properties view, select
the Attributes tab, find the connectionString property,
and change the port number to 2658 as
the connection port to the database.
Maximize the Properties view, select the Quick Edit tab, find the Show Navigation Bar property, and select false from the drop-down list.
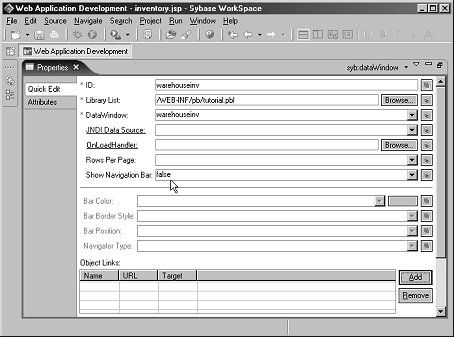
In the Properties view, find the Object Links section and click Add to attach a link to another DataWindow.
When the Create Objectlink dialog box opens, complete these options:
Link Name – Select item_num from the drop-down list.
Link URL – Click Browse, select MySybStore_Tutorials_Web/webroot/Inventory.jsp, and click OK.
The following text displays in the field:
/Inventory.faces
Link Target – Select _self from the drop-down list.
Click Add to add Link Arguments to this link.
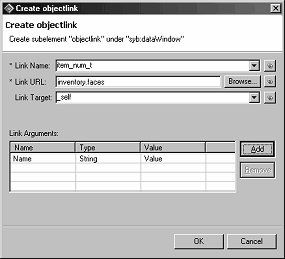
In the Link Arguments table,
change the Name to itemnum,
select DW Column from the Type drop-down
list, change Value to item_num,
then click OK.
Minimize the Properties view, then maximize the editor.
In the editor, move the cursor to the end of the warehouseinv DataWindow and press Enter twice to add two <br> tags.
Minimize the editor to see the other views.
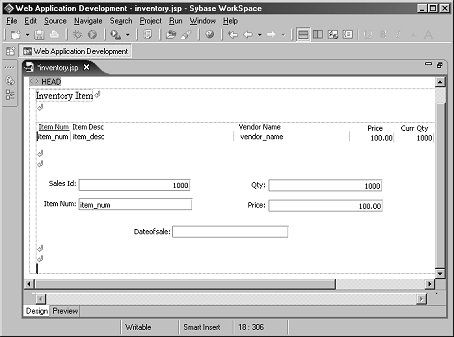
In the WorkSpace Navigator, expand MySybStore_Tutorials_Web/webRoot/pb/tutorial.pbl, locate the orderdw DataWindow, then drag and drop it after the last <br> tag in the editor. The orderdw DataWindow displays on the page.
Put the cursor after the ordersdw DataWindow and press Enter twice to add two more <br> tags.
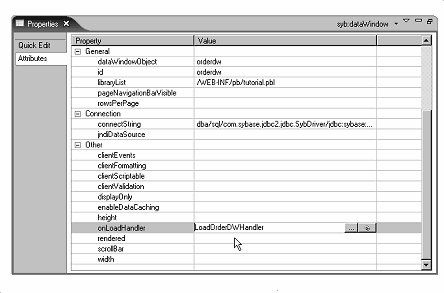
Right-click in the editor and select Show View|Properties.
Maximize the Properties view,
locate the OnLoadHandler property and
type LoadOrderDWHandler as
the value.
Minimize the Properties view.
Select Window|Show View|Palette to open the Palette, then drag and drop a JSF HTML CommandButton after the last <br> tag in the editor.
In the editor, right-click the command button you just created and select Show View|Properties from the context menu.
In the Properties view,
type Submit Order for the Value of
the command button.
In the Properties view, scroll down to the Listeners section and click Add to add an action listener to the Submit Order button.
Double-click the <f:actionListener> entry
in the Listeners table, then type OrderButtonListener in
the Type field.
Select File|Save from the main menu bar to save the page.
Right-click in the editor and select Run to test the page on the runtime server. When the Run on Server dialog box opens, select Choose an existing server. Select a server and click Finish.