![]()
![]()
![]()
![]()
This section provides instructions on how to use the SEF Import utility.
![]() Using the SEF Import utility
Using the SEF Import utility
In ECMap’s main menu, select Utilities > Import > SEF Standards. The Import SEF Standards window displays.
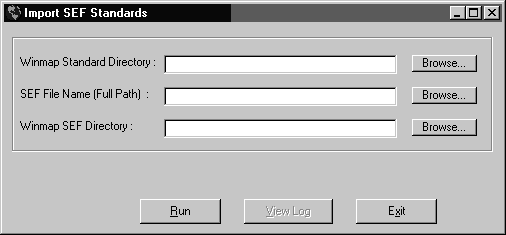
Populate all fields in the SEF Standards window by typing fully qualified paths or by clicking Browse to navigate to the appropriate locations:
In the EDI Standard Directory text box, browse to the location that contains the version of the bundled X12 standard corresponding to the version of the SEF Standard to import.
In the SEF File Name (Full Path) text box, browse to the (source) directory from which the SEF Standard is imported.
In the SEF Output Directory text box, browse to the directory to which the SEF Standard is imported.
Click Run.
If you specified a directory that does not exist, a dialog box appears, telling you that the directory does not exist and asking whether you want ECMap to create it for you.
Choose one of the following:
Click No in order to browse to an existing directory or type one that you want to create.
Click Yes and ECMap creates the directory. The View Log button on the Import SEF Standards window is active.
Click View Log and the <date> Standards Creation Log window appears with a list of all the log messages created while the SEF Standard was being imported.
Click Cancel to exit the <date> Standards Creation Log window.
Click Exit on the Import SEF Standards window to return to the main ECMap window.
You can now use the SEF Standards that you imported just as you would use any other standard. If you want to use a SEF Standard, simply point to the directory containing the SEF standard you want to use when you define your map on the Map Directories tab of the New Map Definition window.
