![]()
![]()
![]()
![]()
To open the Any-to-Any Map window, select Map on the Toolbar or on Workspace, or choose Mapping from the Build menu on the main ECMap window.
When the mapping window is opened for a new map, the Rule Definition-New window displays.
On the Rule Definition-New window, enter the Rule Number and Rule Description of the rule that contains the mapping instructions and select OK. The Any-to-Any Map window displays.
Under Rule in the top right corner of the Any-to-Any Map window, the rule number that you entered on the Rule Definition – New window displays in the Number text box, and the program enters a 1 in the Line text box. Each time that source data is mapped to destination data, a new command is created in the rule and the line number is incremented by 1. (When the mapping window is reopened, the next available number displays in the Line text box. This is the next consecutive number after the number of the last rule command created.) This rule is the Before rule in the map flow and contains all of the mapping instructions.
The Any-to-Any Map window is similar to the transaction Mapping window, but the mapping mechanism is very different. Each instance of mapping in an any-to-any map takes place on a separate command line in a rule - the rule you created the first time the mapping window was opened for the map. On the window, there is still source data on the left, destination data on the right, and a mapping section at the bottom. However, there is no EDI data, and data is mapped directly from one application to another in individual rule commands.
When you originally define the application records for an any-to-any map, you specify a Record Type on the New Records window to indicate whether the record is used as a Source record, a Destination record, or Both. (Refer to the Records/Tables chapter for detailed instructions on defining new records.)
On the Any-to-Any Map window, records designated as either Source or Both appear in the Source pane. Records designated as either Destination or Both appear in the Destination pane. If the record type is left blank, the record appears as both Source and Destination.
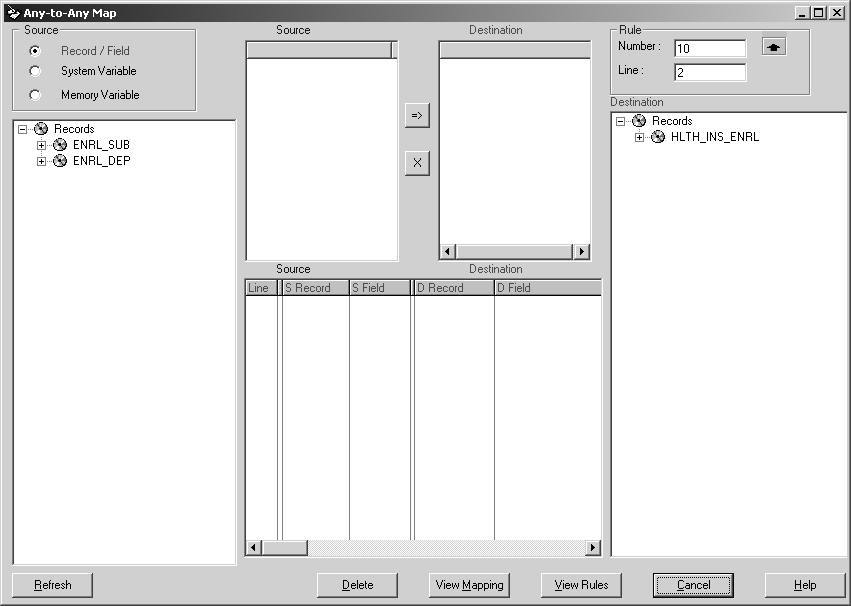
The Any-to-Any Map window is divided into four sections. Records that have the record property of Source or Both appear in the Source section on the left side of the Any to Any Map window. Records that have the property Destination or Both appear on the right side of the Any to Any Map window in the Destination section. (Records that are not marked as either Source or Destination are given the property Both and appear in both sections.) Between the two sections is a temporary work area with a Source side and a Destination side. Beneath the Work Space is another section with both Source and Destination sides, where the results of the mapping display. Each instance of mapping has a separate line number in the Mapping section that shows both the Source and Destination record and field (or Source memory variable or system variable).
There are several buttons at the bottom of the window, each of which serve a single special purpose.
![]() Mapping a source field to a destination field
Mapping a source field to a destination field
Open a Source record by double-clicking the record name to display the fields in the record.
Open a record in the Destination section by double-clicking that record name.
Drag a field from the Source section and drop it onto a Destination field.
As you drop a source field onto a destination field, a new line appears in the Mapping section at the bottom of the window, showing the results of your actions. This is a new command line in the current any-to-any mapping rule.
Another way to map Source fields onto Destination fields is to double-click successive Source fields, and then double-click successive Destination fields. As you do this, you see these fields displayed on the two sides of the temporary work area above the Mapping section in the middle of the window.
When you have finished selecting the fields, select the button between the two sides of the work area. Each Source field is mapped to the Destination field directly across from it in the temporary work area, and the results display in the Mapping section underneath the temporary Work Space. If you select X between the Source and Destination, all of the entries in the work area are removed.
![]() Mapping a memory variable to a destination field
Mapping a memory variable to a destination field
Map a memory variable to a destination record field by selecting Memory Variable in the box at the top left side of the Any to Any Map window above the Source section. (Record/Field is the default selection.)
A list of all available memory variables is superimposed over the Source section of the window. Map a memory variable to a record field by dragging a memory variable and dropping it onto a Destination record field in the same way that you mapped a field onto a field.
![]() Mapping a system variable to a destination field
Mapping a system variable to a destination field
Map a system variable to a destination record field by selecting System Variable in the box at the top left side of the Any to Any Map window above the Source section. (Record/Field is the default selection.)
A list of all available system variables is superimposed over the Source section of the window. Map a system variable to a record field by dragging a system variable and dropping it onto a Destination record field in the same way that you mapped a field onto a field.
![]() Refreshing the mapping commands
Refreshing the mapping commands
The Refresh button at the bottom of the Any-to-Any Map window updates the window to reflect any changes that have been made to the current mapping commands.
![]() Removing a command line in the mapping rule
Removing a command line in the mapping rule
Use Delete button at the bottom of the Any-to-Any Map window remove one instance of mapping, or one command in the mapping rule.
Highlight the command and select Delete. The highlighted command line is removed.
![]() Refreshing the mapping window
Refreshing the mapping window
Use the View Mapping button at the bottom of the Any-to-Any Map window to refresh the mapping section of the window with the contents of a mapping rule.
![]() Switching between mapping and rule functionality
with View Rules
Switching between mapping and rule functionality
with View Rules
The View Rules button at the bottom of the Any-to-Any Map window is used to switch between mapping and rule functionality. This allows you to add additional logic to your map and perform operations on fields that allow them to be converted correctly.
Select View Rules. The Rule Definitions window displays.
To return to the Any-to-Any Map window from the Rule Definitions window, select Mapping (which appears when you highlight a rule command), or you can highlight a rule command and choose Any-to-Any from the Command menu.
