![]()
![]()
![]()
![]()
This shows how to create an employee list application. The employee list shows total sales figures for each sales representatives using information in sampledb.
![]() Creating the employee list of sales reps
Creating the employee list of sales reps
In Mobile Web Studio, select Applications in the left pane, New in the Application Builder Status menu, and click the New button.
In Application Builder, click the down arrow to the right of Add, and select Database Element.
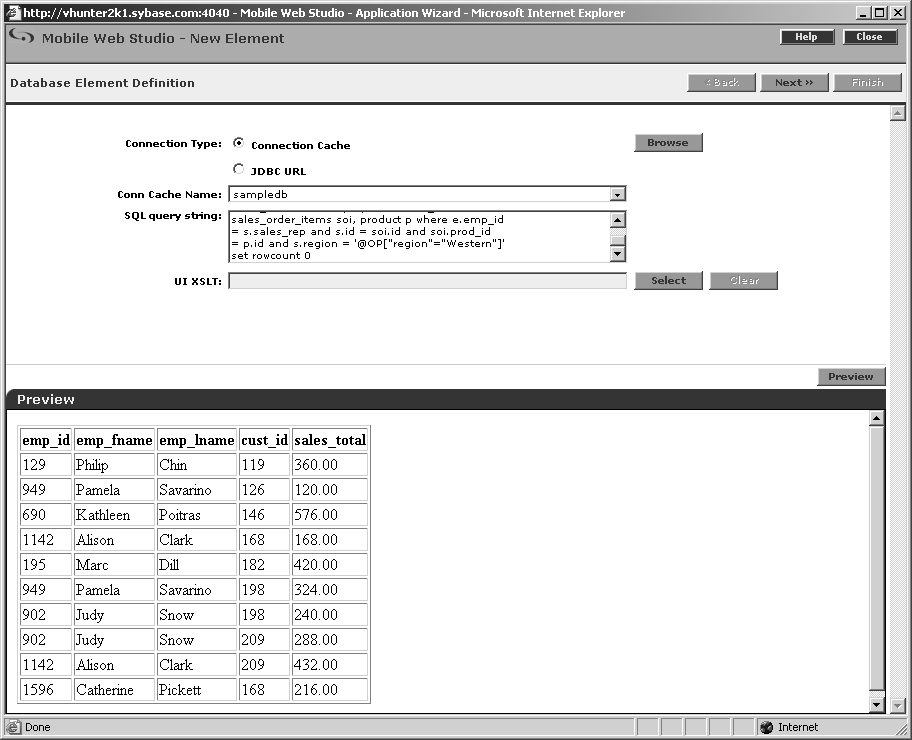
On the Database Element Definition window, define the database element:
Select the Connection Cache option.
In Conn Cache Name, select sampledb from the drop-down list.
In SQL query string, enter this query:
set rowcount 10
select e.emp_id, e.emp_fname, e.emp_lname,
s.cust_id,  (soi.quantity * p.unit_price) as
sales_total from employee e, sales_order s,
sales_order_items soi, product p where e.emp_id
= s.sales_rep and s.id = soi.id and soi.prod_id
= p.id and s.region = '@OP["region"="Western"]'
set rowcount 0
Click Preview and make sure these columns are included: emp_id, emp_fname, emp_lname, cust_id, and sales_total.
Figure 4-2: Preview for EmployeeSales
Click Next. The Define window displays.
On the Define window, select “Records Contain
Labels,” in “Labels are Displayed in Record” accept
the default 1.
Click Next. The Filter window displays.
Click Next. The Configure Parameters window displays.
On the Configure Parameters window, make these modifications (otherwise accept the defaults):
Region – click the Variable box, and make these changes:
Type – choose “Select” from the drop-down list and click Add. The Edit Default Value window displays.
In the first row, Western displays for both Display Name and Value.
Click OK to accept the values and close the window.
Personalize – choose “database table” from the drop-down list.
Key – region displays
as the personalization key (you created region in “Creating a personalization key”). If a different
key displays, select “region” from the drop-down
list.
Click Next. The Window Preview displays.
In Element Name, enter employeeSales,
and click Finish.
In Application Builder, click Save to create the application.
On the Finish window, make these changes (otherwise accept the defaults):
Content tab Select 15 minutes for the Content Cache Interval. The Content Cache Interval determines how frequently the UA server retrieves data from the back-end system (in this case the sampledb database).
Mobile tab Select “Make Available to Offline Devices,” then click Finish.
Click OK to confirm.
Click Close to close Application Builder.
When you return to the Mobile Web Studio main window, select New from the Application Builder Status menu. The employeeSales application displays in the detail pane.
In Mobile Web Studio, right-click the employeeSales application in the detail pane, and select Approval Status | Approved.
Click OK to confirm.
Select Approved from the Application Manager Status menu. You see your newly approved employeeSales application in the detail pane.
