This tutorial introduces you to the basic process of using the @OP tag to insert a parameter. At runtime, the parameter is replaced with the data that you specify. The @OP tag is often used in SQL queries, as it allows an application to use parameterized queries. You can also use the @OP tag for HTML fields.
See the Unwired Accelerator Developer’s Guide for information about grid rules, and using @OP tags in grid rules and with HTML.
![]() When you create an application with input parameters,
you must define a default value to register as click-across event
listeners.
When you create an application with input parameters,
you must define a default value to register as click-across event
listeners.
![]() Creating a parameter using the @OP tag
Creating a parameter using the @OP tag
Log in to Mobile Web Studio.
Select Applications in the left pane, and click the New button to launch Application Builder.
In Application Builder, click the down arrow to the right of Add, and select Database Element.
On the Database Element Definition window:
Click the Connection Cache option.
Conn Cache name – select msales from
the drop-down list.
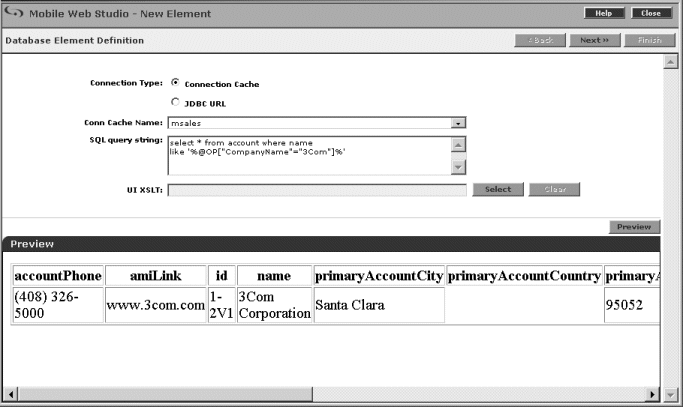
SQL query string – enter:
select * from account where name like
'%@OP["CompanyName"="3Com"]%'
This @OP tag creates a parameter named CompanyName and sets its default value to 3Com.
Click the Preview button to test the database connection and the SQL command.
Figure 2-2: Database element definition

On the Database Element Definition window, click Next.
Use the Define window to identify record 1 as the header
row. In the Define Record Layout section, click “Records
contain labels,” accept the default 1 in
the “Labels are displayed in Record” option, and
click Next.
On the Filter window, click Next to continue as this feature is not used in this tutorial. The Configure Parameters window displays with a list of parameters used to capture the table.
On the Configure Parameters window:
Clicking the Variable check box to the left of CompanyName exposes additional parameters.
Make sure the Default Value is set to 3Com,
and click Next.
On Window Preview, in Element Name, enter CompanyAccount (no space),
and click Finish. The New Web Element window closes.
On the Application Builder window, the CompanyAccount element displays
in the Element List. Click Save.
On the Finish window, accept the defaults, and click Finish to save the application.
Click OK to confirm.
In Application Builder, the CompanyAccount application displays in the detail pane.
In Company Name, enter part of a name of any other company or companies in the sample msales database and click Update.
For example, enter tech to
pull up all account records that have the string “tech” somewhere
in the name field. Other examples you can enter include store, oak, health, auto,
and corp.
Click Close in the upper-right corner to close Application Builder.
In Mobile Web Studio, approve the application:
Click New under Application Manager Status in the middle pane. The CompanyAccount application displays in the detail pane.
Right-click the CompanyAccount application, and select Approval Status | Approved.
Click OK to confirm.
Select Approved from the Application Manager Status menu. You see the CompanyAccount application in the detail pane.
You can use multiple @OP tags simultaneously, as shown in this example SQL query that uses two @OP tags to perform a search based on a company name and a state.
select * from account where name
like
'%@OP["CompanyName"="3Com"]%'
and primaryAccountState
like '%@OP["State"="CA"]%'
If you use multiple @OP tags, additional parameters appear on the Configure Parameters window when you create the application.
When you create an application with input parameters, you must define default values to register as click-across event listeners.