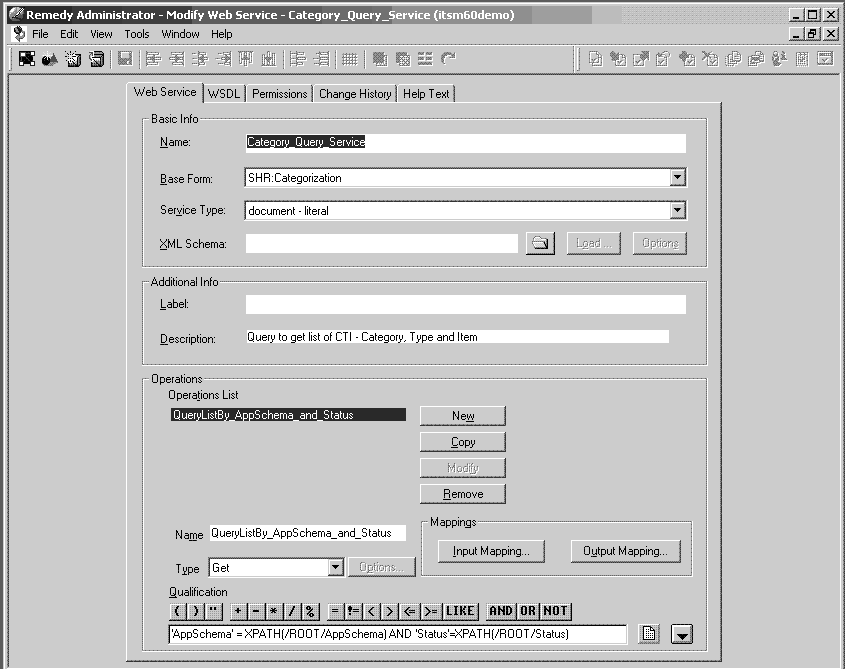
This section shows how to create a Remedy Web service for obtaining category, type, and item data.
![]() Obtaining the CTI values
Obtaining the CTI values
Open the Remedy Administrator wizard and enter your login information.
Select Servers | Host |Web Services, where Host is the name of the Remedy server. Right-click Web Services, and select New Web Service.
In the New Web Service window, make the following entries:
Figure 8-2: New Web Service window

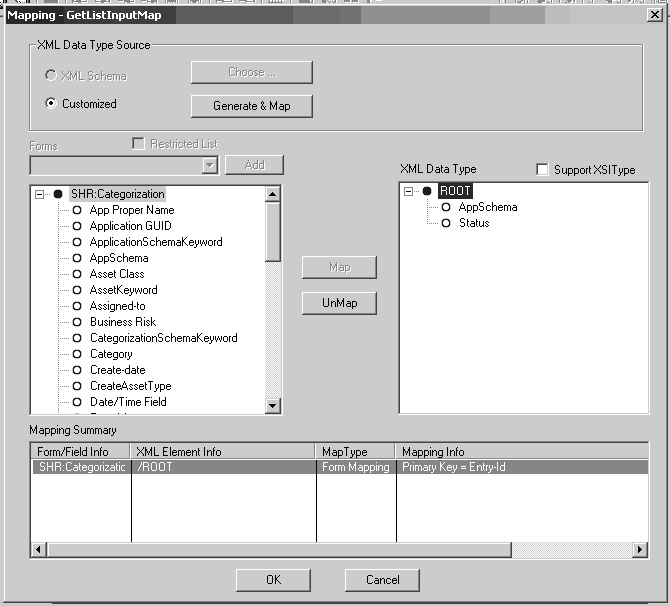
Click Input Mapping to define the input mapping as shown.
Figure 8-3: Input mapping window

Click OK.
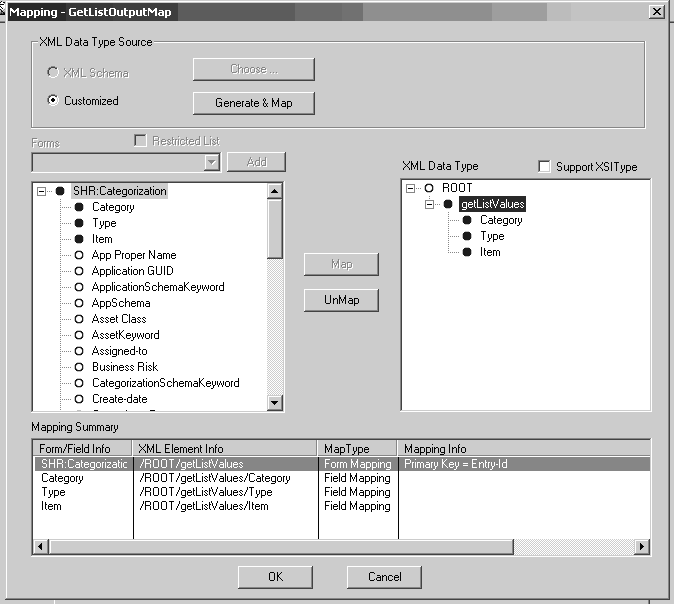
Click Output Mapping to define the output mapping as shown.
Figure 8-4: Output mapping window

The ROOT element can be left unmapped, but the getListValues entry is mapped to the SHR:Categorization entry in the form. Category, Type, and Item are mapped to the corresponding entries in the form.
Click OK.
Click the Permissions tab to assign the appropriate permissions to the Web Service. From the No Permission list, select Public and click Add.
From the main menu, select File | Save | Web Service to save the Web Service.
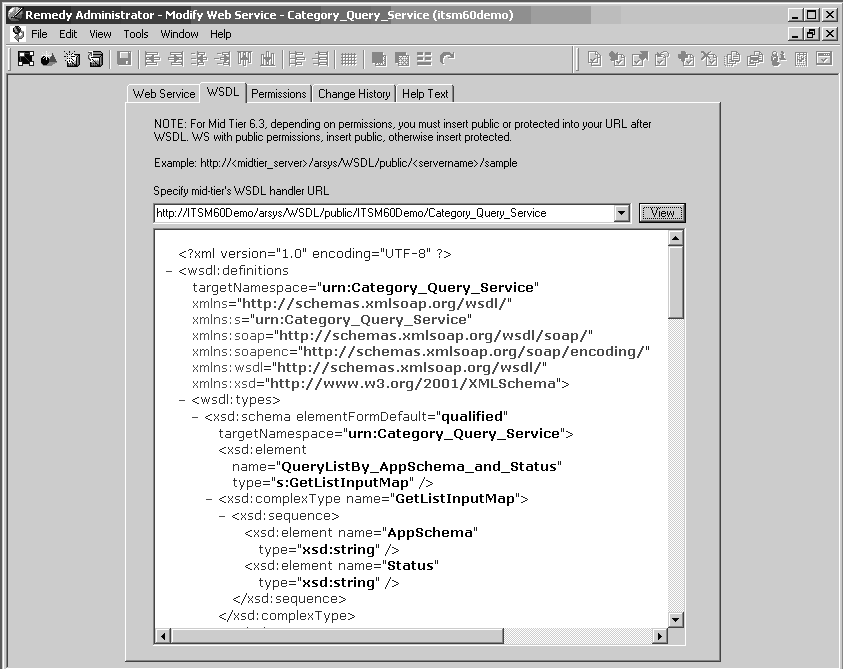
Verify the WSDL is accessible from the Remedy midtier server.
Click the WSDL tab.
Edit the WSDL URL field according to the instructions on the tab.
Click View.
A WSDL similar to the one shown below displays.

Now you can use this Web Service in Unwired Accelerator to obtain and link the Category, Type, and Item values automatically to your Remedy UA insert and update applications.
![]() Importing the UA linked parameter application
Importing the UA linked parameter application
In Mobile Web Studio, select Build | Applications.
In the toolbar above the detail pane, click Import/Export.
In the Export/Input window, click the Import tab.
Click Browse to navigate to the %UA80%\tomcat\webapps\onepage\portlets\jsp\custom\remedy direcotry, and double-click the RemedyMenuSelections.xml file.
Click Upload, then click OK in the confirmation pop-up window.
Click Import.
Click OK in the pop-up window that confirms the import
was successful. You see see the RemedyMenuSelections application
in the list of approved applications.
In the Approved applications detail view, right-click the RemedyMenuSelections application and select Edit.
In the Application Builder, in the left pane, you see the RemedyMenuSelections application contains three elements. Right-click the RemedyRSDList element and select Edit | Definition. The Web Service Element window appears.
In WSDL URL, you must change the server names and port numbers to match your installation of the Remedy server and Remedy midtier server. Click Finish.
Repeat steps 8 and 9 for each element contained in the RemedyMenuSelections application.
After editing the definitions of each of the three elements, click Save in the Application Builder window to save the changes.
![]() Linking the parameters in the ModifyHelpDeskCase
and CreateHelpDeskCase applications
Linking the parameters in the ModifyHelpDeskCase
and CreateHelpDeskCase applications
In Mobile Web Studio, select the ModifyHelpDeskCase application, and click Edit.
In the Application Builder, click Params.
In the Configure Parameters window, click Next.
For the Category parameter, under Display Type, select Linked.
Next to the Category parameter, click Add.
In the Find Portlet window, click Search.
In the Results pane, select the Category Query Web service you created in Remedy and click Add.
In the Configure Parameters window, click Save.
This procedure enables the ModifyHelpDeskCase and CreateHelpDeskCase application to automatically show the defined CTI values in the relevant fields as drop-down lists.
Now you can deploy the Remedy application and try it out. See Chapter 11, “Deploying Applications to BlackBerry Devices.”
For additional information, see RemedyHelpDeskSample.doc located in %UA80%\tomcat\webapps\onepage\portlets\jsp\custom\remedy, which documents the Remedy sample included in UA.